Wednesday, January 12, 2011

Graining!

Day 10 of the bucking solution finally arrived and I was ready for action.  Cleared my schedule so I could work on the hide all day. (Well, I'm on break, so let's be honest...not much to clear from the schedule, but it was very good that I had large chunks of time available so I didn't feel rushed.)

I started the process by rinsing the hide with water to remove the wood ash. 


Well now, the composition of this photo is not quite what I had in mind, but I think you can still understand what's happening.
 Then, I made a dress! A dress out of a hefty bag! I was going to embellish it a bit more, maybe make some designs out of various colors of duct tape, but I had to stay on task.

Why yes, that is an empire waist on my hefty dress.
 I placed the hide on my graining beam like I described in the last post-- with one end of the hide held in place between my stomach and the end of the beam.  I leaned into the edge of the beam, and since it was angled down to the corner of the floor and wall, it stayed in place.  The step ladder provided extra stability and support. 

I wanted to scrape my drawknife down with the grain, meaning the direction that the hair grows.  This ensured that I removed the hair follicles and the grain layer.  If I went against the grain (like petting a dog in the opposite way the hair grows), then I risked cutting off the hair only and leaving the follicle in the grain.

The wet hair shows the direction of the grain.
I tried to be meticulous with the removal of the grain, working in one area until it was completely gone.  The book warned that if I didn't do this, I'd become frustrated and think of suicide (no joke!).  It took five full hours of continuous removal, exactly what the book said it would take.  The palms of my hands were sore and bruised by the time I was done.   Although my drawknife has the perfect edge, the handles are positioned as if using it by pulling down (as demonstrated when I de-fleshed), and not pushing away from the body.  I should have constructed padded areas, but I was running on adrenaline (takes force to remove the grain) and by the time I realized it was uncomfortable, I was almost finished.  (That's my soapbox moment to tell you to think through your tools and set-up to make sure everything will be comfortable and ergonomically correct.) 

Look closely at the center of this photo, where the hair is still attached.  That's a tick! Gross! I found TWO while graining. (Both dead, thank goodness.)

My grandparents let me borrow two Native American-style stone scrapers.  One was "authentic" and found in a field, and one was fashioned by my uncle.  The metal was much faster, but it was pretty neat to work with stone.

You can see the grain really well in this photo- it's the pinkish layer that's between the hair and the white hide.  (The hair fell out without removing the grain in many places, but the point is to get the grain, not the hair alone.)

Almost done!

Whew.  There were many holes around the edges of the hide from when it was skinned, but I may have added my own along the way... Bummer, but to be expected for a novice.  If you decide to tan, try to get a hide that has been removed from the animal by pulling it off, not using a knife.

The aftermath.
Why remove the grain? There are processes that allow you to keep the hair (for the luscious bear skin rugs), but I want buckskin/leather, so the hair must be removed.  The grain must be removed, too, so that the oils from the brain can penetrate the hide to make it soft, and so it'll be easier to physically stretch open the fibers during the last step.

Sunday, January 9, 2011

A watched bucking solution never swells...

I recovered from the bear skinning and got back to the bucking waiting game.  The hide was fine sitting in the solution for up to 10 days, but after that could start to swell too much, turning into mush/glue.  I checked the hide after 2, 3, and 4 days, but then left it alone until the maximum 10 because I thought that it'd be best to give it as much time as possible.  The grain layer (the layer of skin that holds the hair follicles) is very difficult to remove, and even see, if it's not fully swollen.
I find that I'm always a little nervous when opening the bucket because I'm never sure how the hide will smell.  While in the bucking solution, it only smelled vaguely of glue...hard to explain, but a swollen smell that wasn't really offensive. Didn't even have the gamey/wild animal smell that it had while de-fleshing.
To check the hide, I cut a bit off the neck (because the neck is much thicker than the belly or legs and therefore takes the longest to swell).  I looked for a brownish or "tawny" color indicating that it was swollen.  I'm not 100% sure what "tawny" is, but I was picturing the yellow-brown color that I associate with cartoon drawings of deer.  However, every time I checked, the hide was still a white-bluish color, meaning it wasn't swollen yet.  It was very blue the first time I checked (after only 2 days), and then got warmer in color as the days passed.
Digging in, trying to find a thick area.

Hard to tell, but this is actually too bluish-white.

A few days later...still difficult to see in this photo, but it seemed a little too white, although no longer bluish.  The problem with doing something yourself that you've never seen demonstrated is that you have no idea what you're looking for in each step. It's a little frustrating. (A lot frustrating.)
While waiting I also prepared for the next step by making a better fleshing beam (it'll technically be a "graining beam").  I wanted a beam that was about 3-6" in diameter so that there would be appropriate contact between the beam and the drawknife.  It had to be round because the knife just doesn't work well on a flat surface. It might seem counter intuitive if you're picturing it in your head, but trust me...or if you're a woman (um, or a man who has shaved his legs), think about how dangerous it is to shave on your ankles compared to the back of your calf muscle.  You're more likely to cut yourself around your ankle because the razor blade is wider than the skin it contacts and can dig into it.  But on the back of your calf, the skin is flatter with more even contact with the razor, making it less likely to nick.  Does this make sense?

I went to Lowes and bought some thick gloves coated in PVC (key to brain tanning, I'd say), as well as a corner fence post.  I told the man who was helping me that I  needed a fence post for brain tanning! He couldn't care less.  Maybe he gets that all the time.  I sawed a piece out of the fence post so it would fit onto a step ladder (see below).  It's been years since I worked in my Dad's workshop, and boy did it feel great to be using a handsaw again.
Look at me! I'm sawing!
The notch I cut out to rest the beam onto the step ladder for stability.

Demonstrating how I'll use the graining beam.  The edge of the hide will be pressed between my stomach and the end of the beam while the rest of the hide rests on the beam.  This allows me to work with it by pushing the drawknife down and can be rotated easily.
My Mom also helped me line an area of floor and wall of the garage with plastic to catch all the splatters/flying hair/etc.  We're quite fond of picnics and celebrations in my family, so we fancy 'em up with plastic table cloths.  With plenty on hand we used those, but any type of plastic sheeting would have sufficed. Also laid out old newspapers to help soak up the water. 

All set! Just needed that dang bucking solution to finish up...

Friday, January 7, 2011

Time out for a bear skinning.

While waiting for the hide to swell in the bucking solution, I got a phone call that doesn't happen everyday, at least not to me.  I'd been hemming and hawing about visiting my grandparents and cousins when my aunt called me.

"Oh hey Fran, what are you up to?"

"Just getting ready to look at the hide to see if it's ready to rinse and grain."

"Are you coming down to Fulks Run tonight?"

"Not sure..."

"Well maybe you'll change your mind when you find out---Walker got a bear!"


I felt it where there was no blood.  Very soft (I guess I should have known that).

Hot dog! Everyone in the family was all excited and taking pictures with the bear (not the girl from Maryland who was with another cousin, though...she seemed scared).  I got there just in time to meet up with Walker as he took it to the house of another hunter for skinning.  Two of the men were hunters and one was a taxidermist.  Not sure what they thought about a girl showing up to the skinning. I always think it's some special and unusual thing to be interested in the goings-on with dead animals, but in the country, the women are tough.  When I was the only girl at my taxidermy course in Wisconsin, I thought I'd get different treatment.  No way. 

I talked taxidermy shop with the taxidermist and he explained some of the anatomy as they were skinning the bear.  Walker was deciding between a half mount and shoulder mount, meaning the skin had to be carefully removed around the head and front paws to preserve it.  It's difficult to mount a skin that you've cut and then sewn.  Half mount is literally half the bear, and shoulder mount basically means the head.  When you see a deer mounted with its neck and head, that's technically called a shoulder mount. 

Whenever I see something like this for the first time (you know, a skinning), I'm always a little nervous about seeing the carcass, but it ends up being more of a learning/interesting experience.  The meat was cut into different pieces and shared with the other hunters (ribs, thighs, etc.).  I've tasted bear once; it was canned and from a man at Biltmore who lives in Appalachia.  I could never understand about 90% of what he said to me.

I know these pictures are weird, and I'm not quite sure how much you'd appreciate me trying to talk you into enjoying them.  So I've decided I'll just post them, and you can be the judge of whether you find them fascinating or disturbing.


The fellas said that hundreds of bears from the surrounding mountains have been skinned in that room over the decades. 


That's my hand (see the sillyband?); that's as far as I helped.  The men said other bears have had about 4 more inches of fat than this one.

Walker, splitting up the meat.

This one is my favorite.

After.

Good job, guys.

Thursday, January 6, 2011

Roll up your sleeves, girl!


Christmas Eve.  While others were out finishing their shopping/eating cookies, I spent my day de-fleshing the hide and preparing the bucking solution.  Got the bag out of the fridge and slowly dug into it.  We set up tables in the garage so I could get to know the hide like a good friend.  Only a little bit of blood from the areas that still had thick flesh attached, but lots of salt.  Had to wear gloves to prevent my hands from excessively drying out (yeah, see, the gloves were ‘cause of the salt and not at all because it was my first time touching a fleshy, salty, little-bit-bloody dead deer hide). 


I was creeping along and trying to remove the fleshy bits by pulling on them (my preferred method that I learned from taxidermy school), and then by using a butcher knife, but it was taking too long. 


I finally wised up and -get this- I did what the book told me to do!  Found a fleshing post to lean against the garage door and hung the hide using a C-clamp (thanks Dad!).  Jonathan (objects professor) let me borrow a drawknife and skinning knife from his collection, and they worked perfectly.  The drawknife has to be sharp, but not too sharp (“the book” says it should have a beveled edge but be dull), and the skinning knife was a bit sharper to cut down really thick areas.  I only needed to remove flesh ½ in or thicker, but it took me hours to get the job done.

The drawknife I have has handles that are ideal for a pull down fleshing beam, but the beam was so tall that I had to use a clamp instead of wedging it between the beam and wall.  This made moving and positioning the hide a little difficult.

Removing a chunk of flesh (see it dangling?

Relatively clean flesh side.
The next step: Bucking solution.
There are a couple of different bucking solutions that you can use, but I chose the traditional wood ash.  My grandparents have an active fireplace (which makes visiting them very cozy) and they gave me a five gallon bucket full of ashes. 


They burn hardwood, so I needed to make sure that the solution wasn’t too alkaline for the hide.  I did a 2:1 ratio of ash:water and let the bits settle to the bottom.  I then floated an egg in the top layer of water.  If the egg wasn’t floating above the water, I added more ash because the solution was too weak.  If the egg floated but rotated to its side, I added more water because it was too strong.  Once it floated with one end out of the water exposing a quarter-half dollar size area, then it was just right. 

Stirring the ashes in water.  Using gloves because the alkalinity can majorly dry out your hands.

Three eggs were used for the testing.  We make sacrifices for art and science, people.

It took a few hours of testing to make sure that it was the correct strength and I didn’t get it bucking until 9:00 on Christmas Eve. 
Dipping it in the solution that was finally considered the correct strength.

Good sloshing action to make sure the whole hide was coated.
I haven’t done research on modern/synthetic tanning, so I don’t know (yet) how it’s done, but I talked to a taxidermist recently who told me that bucking is definitely an old and time-consuming method (and has been replaced). In this process it’s important for the removal of the hair.  The alkalinity of the wood ash removes mucous from the inner layers of the hide that loosens up/swells the grain layer (layer of the skin that holds the hair follicles), as well as clearing room for the oils from the brains to penetrate the hide to make it soft.   The amount of time needed for bucking depends on thickness of the hide and surrounding temperature.  “The book” suggested at least 3 days, so I moved it inside to our hearth to stay warm and waited for the hide to swell (and I celebrated the holidays with the fam).  So now, we wait....

Tuesday, January 4, 2011

Wanted: Deer Hide and Brains

I decided on the brain tanning virtually the first day of fall semester and bought the tanning book, but had a mild panic attack when trying to figure out how to obtain a hide.  The book suggests getting roadkill, but I didn't want to skin a deer on my own, and I'm not sure if it's even legal in Buffalo.  It also wasn't hunting season yet, so all the salted hides from last year were long gone and I couldn't set up barrels for hunters to give me unwanted bits.  By Thanksgiving it was hunting season, but the meat processing places in New York weren't really playing along.  I think I should've used my deep, hunter-like voice when calling and asking for a hide.  Maybe they would've taken me seriously.  All Thanksgiving I was fretting over how to get the hide, how to get the hide, how to get the hide.  I found out it's illegal to buy/sell a hide in Virginia, so I was at the whims of hunters to just give me one. 


Unwrapping the semi-frozen salted hide.
And then the obvious happened.  You know how your Mom is always finding things for you when you're little? A shoe, a glove, earring, etc.? Well of course my Mom was the one to find a hide for me.  She barely texts but days after T-giving I got a text asking me if I still needed a hide because she found one.  It takes a village to raise a child.  It also takes a village to get that child a hide.  Thanks to Carolyn Bly (Mom's co-worker) and her husband Dickie Bly for letting me have the hide from his deer.  Carolyn literally called Dickie as he was at the meat processors.  Hide interception-success! I practically ran down the school halls with glee from the news!  "Oh that's just Fran running by... She's happy over a deer hide or something."  Mom may have found it, but there was no way she was going to touch it-- the salted hide in an opaque black bag was quickly thrown into our mini fridge (that usually holds Diet Dr. Pepper), awaiting my arrival and appreciation.


The Brains
The maxim goes that an animal has as much brains as needed to tan its own hide, although the brains don't have to come from the same animal as the hide.  I didn't even bother finding deer brains and went straight for pig.
Believe it or not, the brains were actually easier to come by, considering I've got special connections to a happenin' butcher shop in Williamsburg, Brooklyn (the zoo!) called The Meat Hook.   Not only did I get my brains for free, but I got to extract them myself! And by extract, I mean scoop them out with a spoon.  Ok yeah, it was weird, but it was also awesome and felt like a rite of passage or something (anthropology nerd alert!). 

Matt cutting the first (of three) pig head for me.

Brain exposed.

"Hey bro, good job hitting the sweet spot." "Thanks bro. High five!"


My Dad said he's never seen someone look so happy scooping out brains! (Ok and a little devious, too.)

I got the Meat Hook thumbs-up approval.  I'm the best darn brain scooper they've ever seen.

Thanks to all the cute butchers at The Meat Hook for helping me out and putting up with me while I inappropriately waved around knives and left my work spaces dirty.  I helped out around the shop for two days to "pay" for the brains and to improve my hipster street cred.  I even carried half a pig from the shipment!! (And didn't drop it on the floor, thanks to Matt's tag-team help.)  It took three pigs to reach 13oz. of brain.  I needed half-one pound.  Have really enjoyed all the brain jokes, too.


"It's always something."

Why this project...

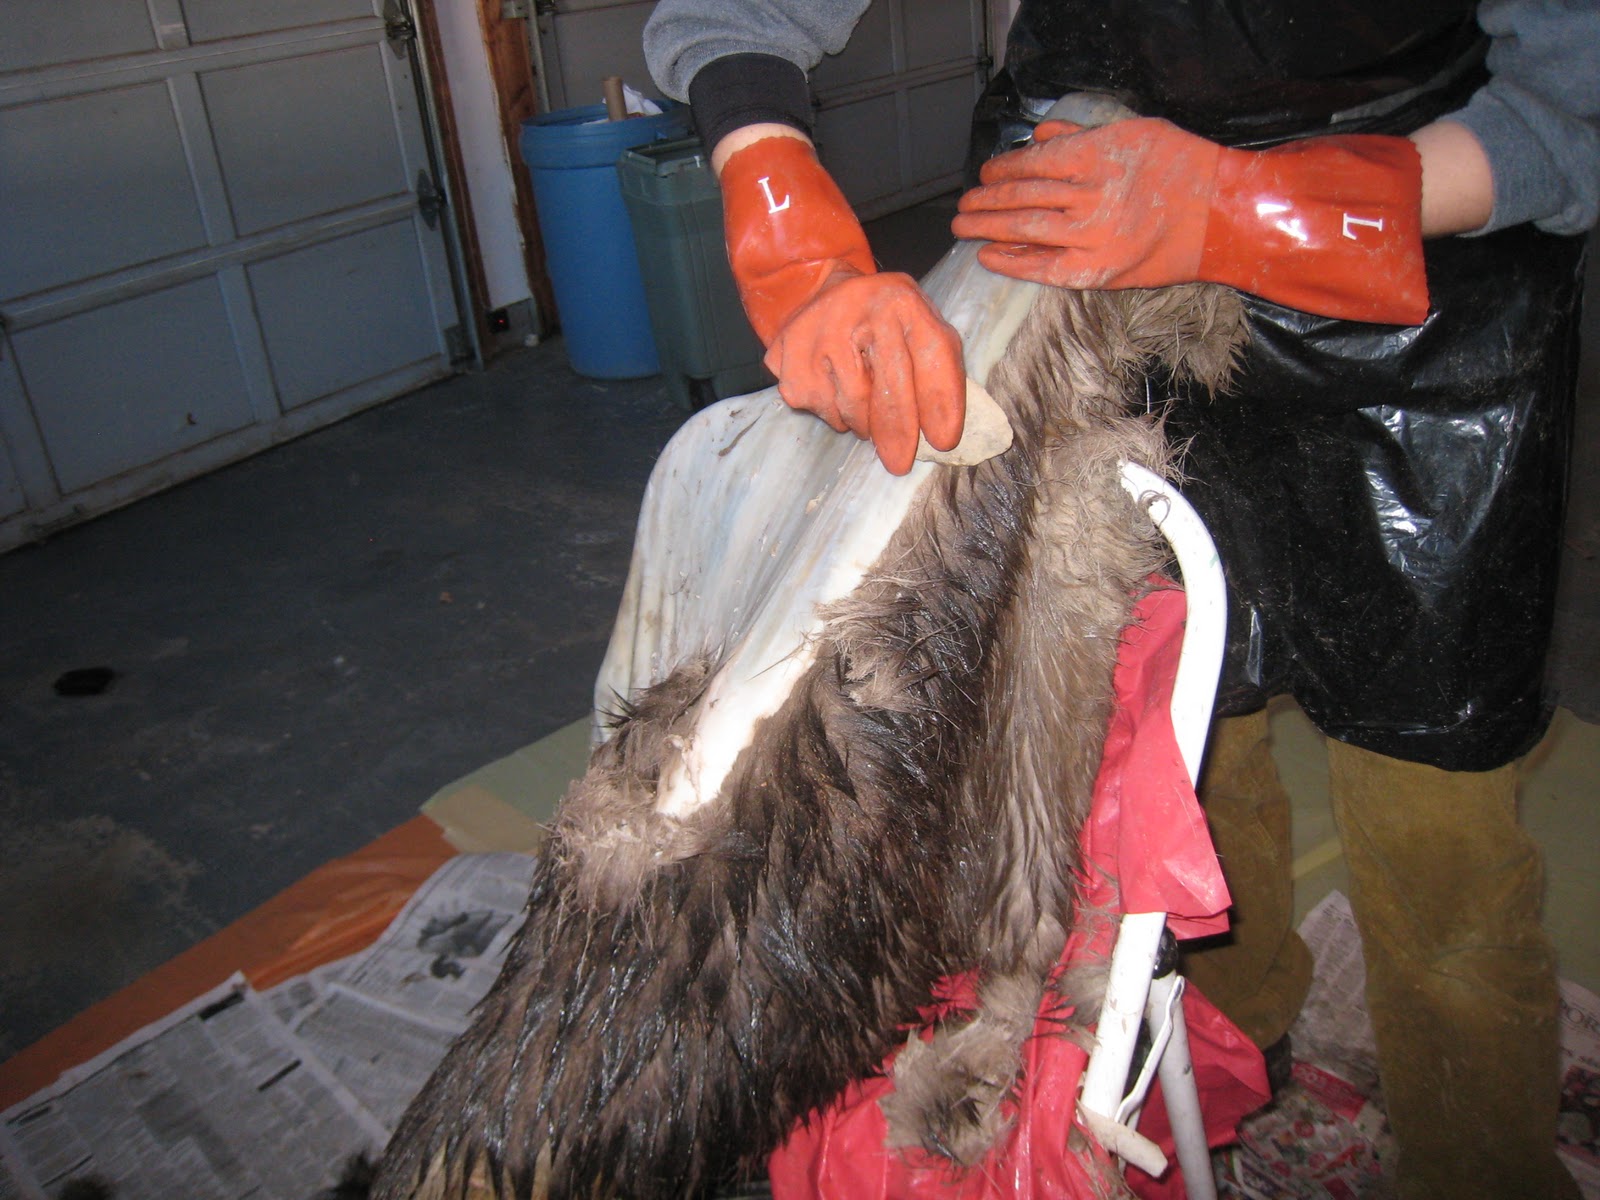
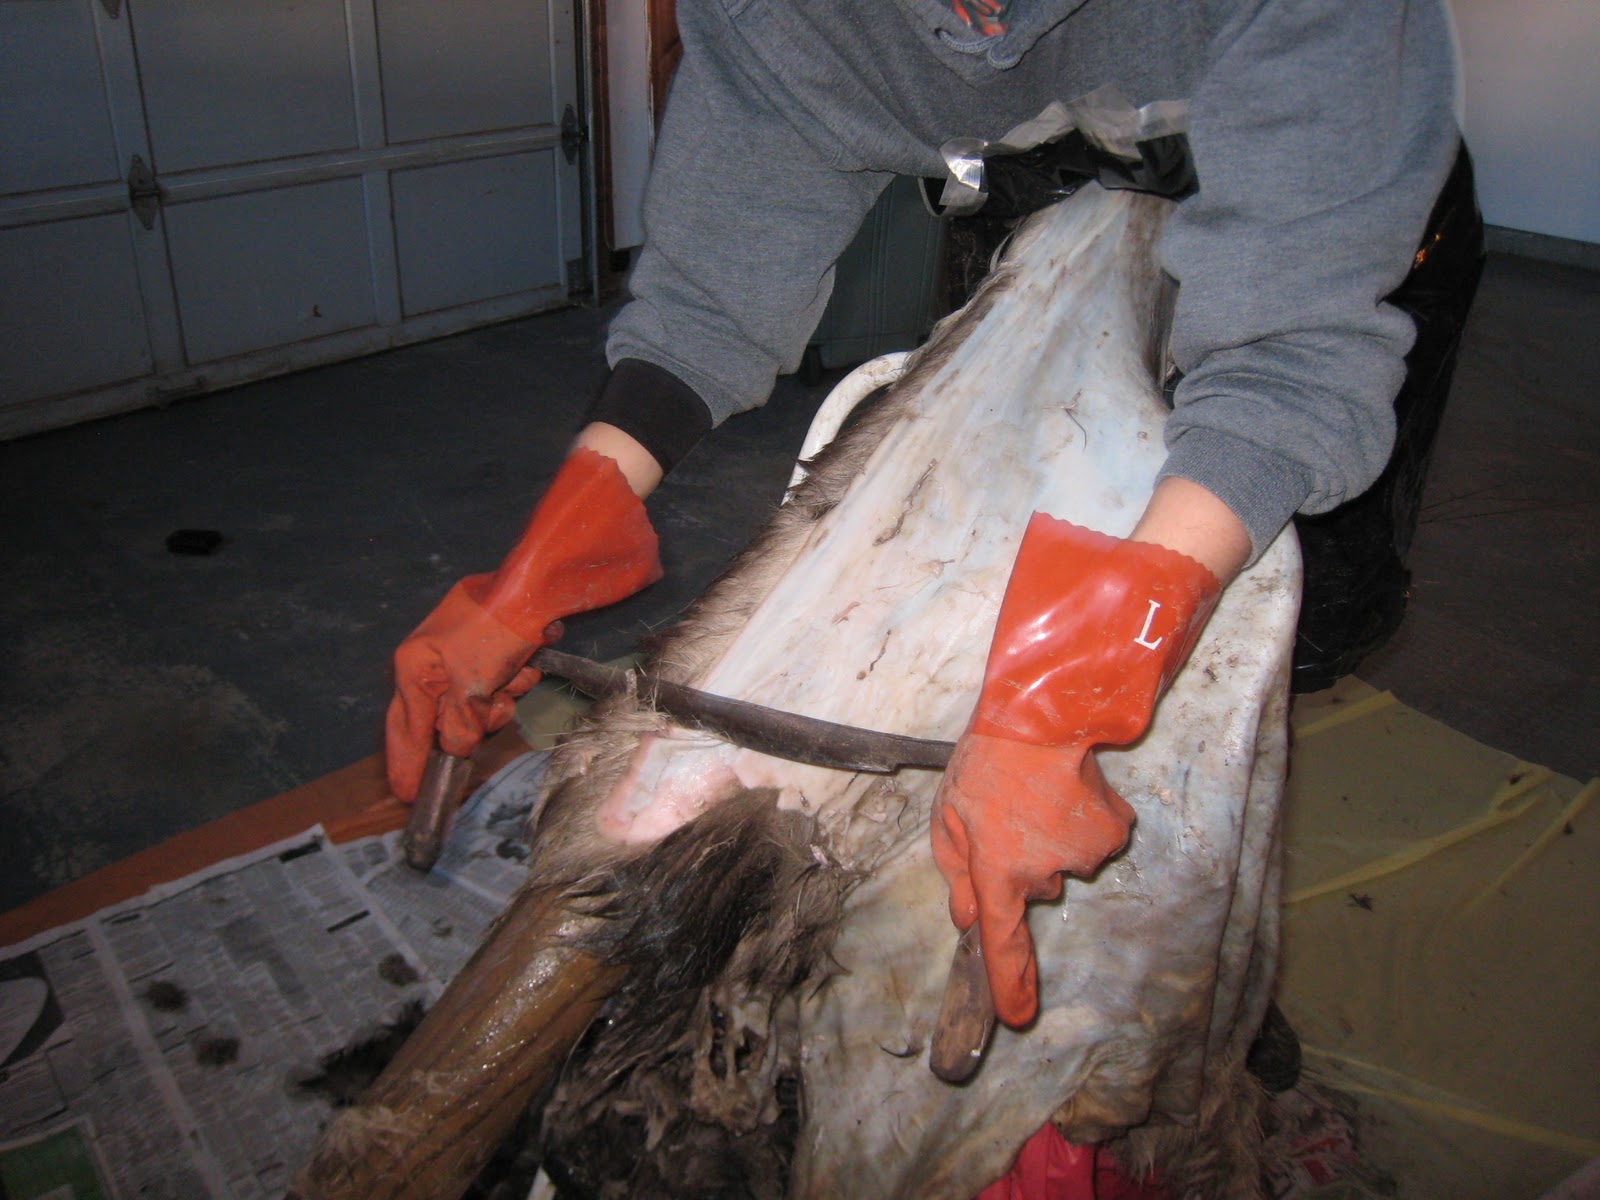
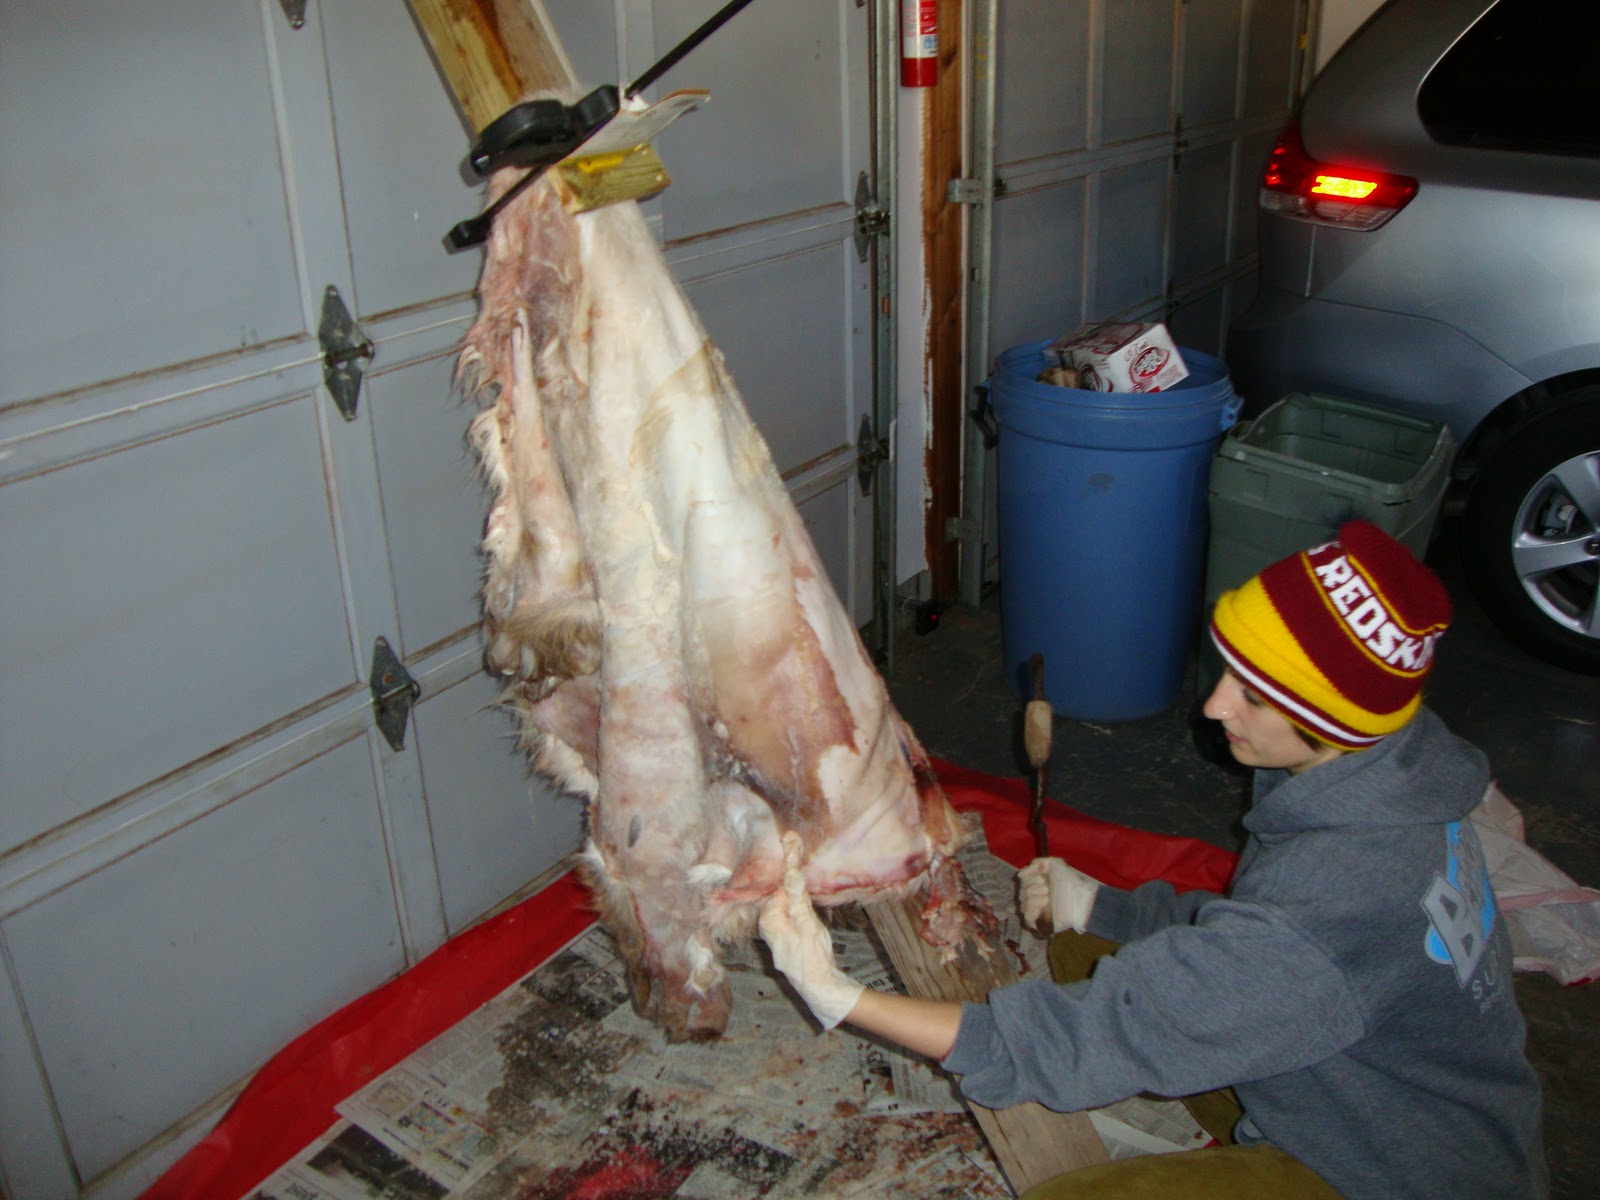
So my brother, Chad, arrived home for Christmas on Christmas Eve and walked into the garage to find my Mom and Dad standing watching me de-flesh a deer hide.  While I was wielding a butcher knife and smiling in front of the hide that was hanging from a pole, he just kind of shrugged and said "It's always something."  Last year at this time I was preparing for my trip to bird taxidermy school in nowhere, Wisconsin, and this year my Christmas break project is brain tanning a deer hide.

Ok ok I'm not just doing this for fun.  Part of our graduate program is to do a "technology project."  We're allowed to choose anything to make. Learning how things are made will help us understand how/why they deteriorate.  If a painting is painted on wood, it will respond to environmental changes differently than if it's on metal.  Ceramic vases and marble sculptures deteriorate differently than taxidermy mounts, and all are found in museums. Other people are doing/have done metal jewelry, baskets, parchment, book binding, stone carving, lathe turning, stained glass, etc. for their tech projects. I'm interested in organic objects (things made of plant and animal materials), a love that started with the taxidermy trophy mounts at my job at Biltmore Estate, and grew when working at the American Museum of Natural History.  So, to prepare myself for a future of conserving leather objects (moccasins, buckskin outfits, water pails, biology study skin collections...), I wanted to make leather so it'll be less of a mystery.  I mean, come on, it goes from hide to leather.  How does that happen?!

From a deer...


Another plus to figuring out how to tan- I get to connect with a process that humans have been doing for hundreds of years (heck, maybe even thousands of years, I should do my research before typing these things).  There are many ways to tan leather, brain tanning being an old process that allows for a durable leather that is, get this, even washable after being smoked!  I'm using a book written by Matt Richards that is "America's Best Selling Tanning Guide"... although I doubt there are too many other tanning guides to compete for this accolade, I'm very pleased with the instruction so far.  The book is Deerskins into Buckskins and can be found on braintan.com, a site that also has some information on the history of buckskin.  Buckskin is leather made of any type of hoofed animal, but it goes through a bucking process during tanning (we'll get to that).  Go to the site! Do it! 

...To brain tanned leather (from braintan.com)
More connecting to the past- I grew up in the booming metropolis of Winchester, Virginia (at the top of the Shenandoah Valley), population 24,000.  Well, it's at least a metropolis compared to the mountains where my parents grew up.  Tanning and learning taxidermy makes me feel a little more country, a little more connected to my roots, and a little more appreciative of all the work our ancestors had to do.  (Whew, sorry for all the sentimentality!)


View of Fulks Run, Va, where my mom grew up.  Dad's home is farther into the mountains.

(If you don't know much about Art Conservation or my previous experiences and you want to know more, let me know! I'll tell you more than you ever wanted to know.)