Sunday, January 23, 2011

"Where's the hot sauce?"

Although I had (a little bit of) leather, the final step of the process was smoking it to make it washable.  The book explained that smoking "coats the fibers with water resistant resins so that the glues can not be reactivated" (pg. 36), and the smoke provides a gaseous form of natural formaldehyde.  The formaldehyde cross-links with the collagen fibers in the hide, which keeps them in place, even when in water.  If not smoked, the hide would be ruined by exposure to water. The smoking also helps fight off rot (although not 100% foolproof), and provides a great yellow-brown color. 

It is believed that Native American groups would only use white, non-smoked buckskin infrequently for ceremonies, since it would be ruined if caught in the rain.  I read an article by the author of the book, Matt Richards, who researched buckskin and believes that non-smoked was actually used frequently.  I visited the American Museum of Natural History (my old stomping grounds) over break and saw a section on tanning in the Eastern Woodland Indians exhibit.  There, on display, was an excellent brain-tanned hide that was completely white (and barely noticeable under a model of a village, which I naturally thought was a shame).  Just something I'll keep in mind/investigate when interpreting museum collections.

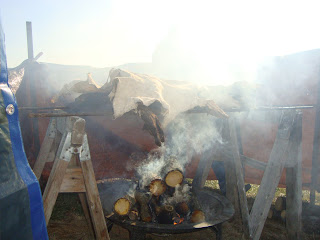
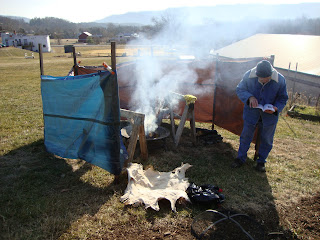
I asked my Papa (that's pronounced "paw paw" for any northerners reading this post) if I could use his front yard for the smoking.  All that was confirmed was that I could use it, and that I'd use a fire pit borrowed from my Aunt's cabin, but of course, when I pulled up to the house, I was greeted with this scene. My Uncle and Papa had built a tarp enclosure to help keep out wind, and already had a fire going using greenwood that was cut the previous day.  Isn't family great?
The greenwood with water steaming and foaming out of it.
I needed greenwood because it smokes more than dead wood (and is more controllable/doesn't burn as quickly).  We actually threw in a couple dead pieces to keep the fire going, so I used a spray bottle of water (Uncle's good idea) to control the flame.
 We placed a BBQ grate on top of two sawhorses, then placed greenwood logs on top of that so the hide wouldn't scorch from the hot grate.  Normally the smoking is done by gluing the hide into a pouch that is hung over the fire...well, since mine was too crunchy to be a pouch, this seemed like the next best idea. 
The country store that my Papa started and my Uncle now runs is the white building on the left.  There is a fenced-in field behind the store that is a professional croquet court, and the family country ham house (Turner Country Ham) is the building on the right.  This is Fulks Run, Virginia, in Rockingham Co.  My Grandmother told me that people were curious as to what was happening in the front yard.  My great Uncle stopped by to test out his new camera. 

It took several days for me to finally wash the smell of campfire from my hair.  Usually I think it's a great smell, now reconsidering.
 After almost two hours of smoking, I was quite a mess.  It was cold out, but I couldn't figure out why my nose was running as much as it was.  It finally dawned on me that it was because my eyes were constantly tearing from smoke exposure.  I'm not a smoker, but I think I inhaled enough that day to be worried over the state of my lungs.  My Grandmother provided dust masks and goggles to try to make it easier, and she also suggested putting metal sheeting around the fire pit to better direct the smoke.  Perfect!  The browning went much faster after the additions. 
Grandma also provided a mug of hot chocolate.  Ahhhhh.  What a life.


The white hide before the smoking.
The brown hide during smoking.  After 2 1/2 hours I decided it was brown enough for me.  As long as there's an overall color change, the step is complete, but it can be taken as far as aesthetically desired.


My uncle Ron was grilling pork and some ribs from the bear (see previous posts).  I have to admit, it smelled much better than my "grilled" hide.
Two weeks after starting the tanning process, I was finished.  Even my Grandmother pointed out that it takes a village to raise a child, and also takes a village to help that child tan a hide.  I think I won't make anything out of the leather pieces, although my friend David did suggest this outfit...
Like I've mentioned, I will mostly likely run artificial aging tests on the leather to research different conservation problems.  I'd also like to try out some modern tanning techniques on squirrel pelts for comparisons, but we'll see! 
That's all for the brain tanning experience, but I have some ideas for other posts, so this probably won't be the end of Tanner Franner.  (Yeah, that sounds extremely corny, but I'm keeping it.)
Thursday, January 20, 2011

The Day of Reckoning

Well well well.  The time for stretching arrived.  While the hide was waiting in the Ziploc bag, I ate a sandwich, did some stretches, turned on the heater in the garage, checked blog stats, milled around for a bit... you know, anything I could do to delay the final step in case it didn't turn to leather.  I finally sucked it up and began pulling/stretching/manipulating the hide in my hands, on my knees, on a sawhorse, anything. 

With all the unnecessary parts removed (grain, hair, membrane), and the brain/oil having penetrated the remaining collagen to help it open up, I needed to stretch the hide while it turned from damp to dry.

Turned the heat up in the garage and used a space heater so it wouldn't take even longer for the hide to dry. (It would be exhausting to keep stretching in cold weather.)


 Sorry again for the sideways video, but here's me, getting up close and personal with the hide (um, yet again).  It was important to work every inch of the hide. I tried to stretch the thinner edge areas first (belly), then focused on the thicker parts (neck, back).


If you just watched the video, please picture me doing that for four straight hours, stopping only to turn the camera on and off, and to grab some water and apple slices (pre-cut during my "avoid the stretching" milling about).  Here's another video, in case you couldn't get enough out of the first one.

The break time apple slices were only possible after my Mom came home early from work when I begged, I mean, asked her for help.  Mom-the Mercenary of Leather Stretching!  (More like "Redeemer of Leather Stretching," since I only paid her with a pat on the back.)  Of the four hours, she helped with the final hour and a half as we watched the brownish raw hide dry to white.

The upper portion of the hide is drying to white.

Thanks Mom!  (Dad was out of town that evening and had to miss the fun.)

This is my favorite picture of the whole experience.


Out of all the help I received during tanning, I needed the most during this step.  The new maxim should read: Many hands make soft leather

Stretched my fingertips raw.  (Yeah, you can't really see it in this photo, but they were red!)


Battered knees from working on the concrete garage floor.
 As the hide was drying, some of the edges were turning super super soft and supple, luxurious even!  That part was exciting.  The part that was not exciting, however, was the middle and main part of the hide.  In the final hours it became clear that no matter how much my Mom and I pulled, it was not drying softly.

After all the preparation, all the hard work, all the smelling of brains, the hide only turned into about 10% leather.  Such. A. Disappointment.  I had to call the game/throw in the towel/bring in the troops when I realized that the middle would forever be a piece of soft on the outside, stiff on the inside, half parchment/half leather.  The outer fiber layers were soft like leather, but the inner layers had not been penetrated by the brains enough to help them stretch open... or maybe I needed more help stretching (maybe using a frame and stick to work the hide, like the picture on the front of the book)... or maybe I hadn't rinsed enough after the bucking... or who knows. 


I'm tugging on the leather, while the stiff parchment-like areas on the left remain crunchy and tug-proof.
 I sat on the couch sore and defeated.  I looked like my puppy dog had just run away.  My Mom tried to cheer me up by suggesting a hot shower and some Chic-fil-A, which did help a little, but it took a few hours before I could play the "Upside Game." 

The hide didn't turn to a beautiful large piece of brain tanned leather, but...
Upside: Some of it did turn to leather, which I can use for science experiments at school.
Upside: Several men told me about their failures in tanning through various methods, so I didn't feel like I was the only person who didn't get it right on my first try.
Upside:  I learned all about the process and will be able to talk to other brain tanners out there to learn even more.
Upside: The project was the talk of the town and I got to work with community, school, and family members.

I was also embarrassed.  I had started this blog and been talking about tanning for quite some time, and I was worried about what people would think after they found out that I hadn't become a master tanner.  But, as usual, friends are supportive and kind...and made me feel much better.  I debated not smoking the hide, but decided to finish so at least the percentage that was leather would go through the whole process.

Wednesday, January 19, 2011

Wringing them brains out...

It was below freezing the morning of the hide wringing (hence the long johns visible in the previous post). 
Proof! Below freezing. (Getting pretty camera-happy at this point, obviously.)
This was the most nervous I'd been while opening the bucket (after all, the hide had been soaking in a brain soup for over 14 hours).  In my previous post about preparing the dressing, I said that I had brought the bucket inside to the fireplace.  Not entirely true.  After a few hours, I took it back to the garage to sit in cooler temps for the remainder of the night to prevent the brains from getting funky (well, funkier). 

A light wringing out in my hands, then a thorough wringing using a slightly horizontal branch on a tree in our backyard and a thick dowel that my handy Dad just happened to have.


Bucket below to catch the dressing in case I needed to soak the hide more.
 
Rolling up the hide into a good bundle for wringing.


One more hand-wring before utilizing the dowel.

It was so cold in the shade that ice crystals were forming on the hide! I was freezing, but the upside was that the hide wasn't drying out too fast.
Here's a long video of wringing brains out of a hide (I will never, ever tire of throwing around the word "brains.")
I repositioned the hide several times and wrung it in both directions (turning the dowel clockwise and counter-clockwise), then stretched it over the beam one more time to make sure all areas were opening.  I made the executive decision that it seemed good, so I quickly got out my sewing kit to sew up two holes that were in the middle of the hide.  I could have sewed some on the edges, but it was difficult (and frigid!) to sew, so I left them alone.
The holes were in thick areas, so I had to use a rock to help me push the needle through. I used polyester thread in the hopes that it would hold up during stretching.

Sewn area in brown thread in the center.  Just an easy whip stitch, but it was so cold in the shade and so difficult to push the needle that I dubbed this step the hardest thus far.  (Had to sew in the shade so the hide wouldn't dry out.)
And that was that.  The next step was stretching and drying, when the hide turns to leather. Presto-chango.  I put the hide in a Ziploc bag to prevent drying out while I prepared the garage for the next few hours' worth of work.....
Don't worry, Mom! I put any "green" thoughts aside and threw away this bag instead of washing and saving. 

Tuesday, January 18, 2011

The power of Mom Jeans

I was beginning to get nervous that I wasn't completing the steps in the correct way, so I changed up my working outfit to channel the power of... Mom Jeans!!  These are work jeans that my Mom let me borrow because they're so ill-fitting, she doesn't even wear them.  I could barely find my belly button, for goodness sakes!


I guess I shouldn't blame the jeans alone for all the trouble finding my belly button.  It didn't help that my long johns were a size too big.


Yikes! This is what happens when you forget to pack work pants when coming home for break...
 Consider the mom jeans just part of my tanning uniform, like any conditioned athlete.  Once properly suited up, I began the final tasks that take the hide from raw to leather. (Stay tuned...)

Monday, January 17, 2011

A little dish I like to call "brain soup"

Yes, that's right folks! With the hide free from hair and membrane it was finally time to thaw out those pig brains.  (I froze them because I knew it would take a while for me to get to this step, and I knew that I didn't want to work with semi-rotten pig brains.)
I added a cup of warm water and, with the advice from the book, used my hands to squish it into a soup-like consistency.  Extracting the brains didn't smell or seem bad, but I think it was because I was surrounded by meat and had already been working with it (and smelling it) for several hours.  This time it was just the brains and me, hanging out in the kitchen, trying to talk my mom into staying to take my picture.  I've never cooked with brains before, so it smelled weird to me.  And the squishing...well, let's just say that I had to put my mind in a different place to prevent from being grossed out... but I eventually got over it. (You can tell how comfortable I get by how deep my hands are in the brains.  Started with just fingertips, but ended up past my wrist.)


I added a cup of warm water, then got to squishin'.

This was something one does not do just everyday...
Once all the brain chunks seemed to be worked into the soup, I measured 2 gal of water that was as hot as I could stand.  The warm water would help the brain penetrate the hide, although with the cold temps, it didn't stay warm for long in the garage. (Although my parents did turn up the heat in the garage, making this experience a luxury compared to what it could have been, had I tanned outside.) 


Brain tanned leather is white (until you smoke it, if you smoke it, when it turns yellow-brown).  You can see the hide turning a beautiful white as I submerge it.


Stretching the hide a bit to make sure the brain was penetrating every surface.

The hide felt soft and slippery when I sloshed it around in the brains.
Once I finished giving the hide a good sloshin', I sealed up the bucket and brought it inside to the fireplace for one last night.

Why brains?  Brains are an emulsified oil (fat) that can work into the fibers of the hide (fibers=collagen, a type of protein) that helps them open up during the stretching and manipulation phase of leather-making.  You want an emulsion of water and oil because there are polar and non-polar ends of the molecules. (*For you non-cooks out there... an emulsion is a liquid mixture of two substances that usually repel one another. Other examples are mayonnaise and balsamic vinaigrette.)  The polar ends (water) will hydrogen bond to the fibers (collagen) while holding the oil in place among the fibers.  During the stretching, the chains of collagen slide past one another (thanks to the oil) and as they dry, they lock into place like glue (which is why you can make glue from hides).  You want to stretch the fibers open enough so that when they dry, they dry locked into a more open position than the raw hide, making the leather soft.  There are other materials you can use instead of brains, as long as they contain oils...like soap and oil, or eggs.  This phase of the tanning process is called the "dressing."  You can't dress a hide until all the other stuff has been removed- the hair, the grain, the membrane, etc.  If any of those components remain, the brains will not be able to penetrate every inch of the hide, leaving you with some soft leather and some stiff/hard rawhide. 

Friday, January 14, 2011

A rinse and a membrane

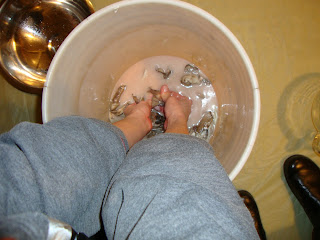
Now that the hair was off, it was time to bring the skin back to a neutral pH.  Normally, the alkalinity is rinsed out during an overnight bath in a flowing creek or river.  I originally planned to use the Shenandoah River that runs beside my grandparent's house, but by the time I finished graining, it was dark and too late for the 1hr drive to the river.  (Also too cold.)  I used the alternative method proposed by the book and placed the hide into a mildly acidic solution of 3gal warm water with 1 cup to 1 pint cider vinegar (depending on thickness of hide).  Having never worked with a hide before, I wasn't sure if mine was considered small, medium, or large, so I used a conservative amount of vinegar.
The hide-in-bucket reclaimed its spot in front of our living room fire where it sat for the night.  The next morning I checked on it like a loving parent, while still in pjs.  This time I was looking for the color to go from the tawny brown back to the bluish white, even in thick areas.  It was whiter, but not quite there, so I made a new acidic solution and kept it in the bucket for another few hours.


Here's me, once again having no clue, but trying!
 
Color a little too warm.
Now the real guessing game.  The book recommended an acidity bath after rinsing...but since I was already using an acidity bath as my rinse, I wasn't sure if I should get the hide completely neutral, or take it out when there was still very slight swelling (therefore mimicking the recommended acidity bath).  It was very nerve-wracking deciding because if the hide was still too swollen, then those areas would not receive the upcoming brains and would not ultimately soften into leather.  I made my best guess and pulled the hide out of the rinse when it seemed almost neutral.  If it really was, I have no idea. 

Membraning Remember when I was de-fleshing and I said I only needed to remove flesh that was 1/2" thick or larger?  Well, after rinsing, it was time to use the drawknife again on the flesh side of the hide to remove any fleshy bits still attached.  There was an overall membrane (loose material between the hide and flesh) that had been stained by the wood ash, making it very easy to see which areas had been removed while working.  Some of it came off easily, while other pieces were so small and resistant that I left them.
Same set up for membraning as graining.
Pulling off membrane.

The white is clean hide, the brown is stained membrane.

It took 3-4 hours to remove all the membrane.

The brown lines/strokes on the hide on the top of the beam are knife marks from when they skinned the deer.

 
My parents noticed that they were the first house on the block to have a raw hide hanging out to dry on the front porch.  You're welcome, Moffett Drive.


Raw hide! Sooo pretty.  The brown bits are tiny pieces of membrane that I couldn't get, but might be able to remove with a pumice during the last step.

Unfortunately I forgot that when I take video sideways, I don't know how to rotate.  If someone knows the secret, please share! In the meantime, feel free to watch this sideways video of membraning.

 I let the hide dry almost completely because the next step is immersion in brain soup, and I want the hide to be full of brains and not full of leftover water from rinsing.