Christmas Eve. While others were out finishing their shopping/eating cookies, I spent my day de-fleshing the hide and preparing the bucking solution. Got the bag out of the fridge and slowly dug into it. We set up tables in the garage so I could get to know the hide like a good friend. Only a little bit of blood from the areas that still had thick flesh attached, but lots of salt. Had to wear gloves to prevent my hands from excessively drying out (yeah, see, the gloves were ‘cause of the salt and not at all because it was my first time touching a fleshy, salty, little-bit-bloody dead deer hide).
I was creeping along and trying to remove the fleshy bits by pulling on them (my preferred method that I learned from taxidermy school), and then by using a butcher knife, but it was taking too long.
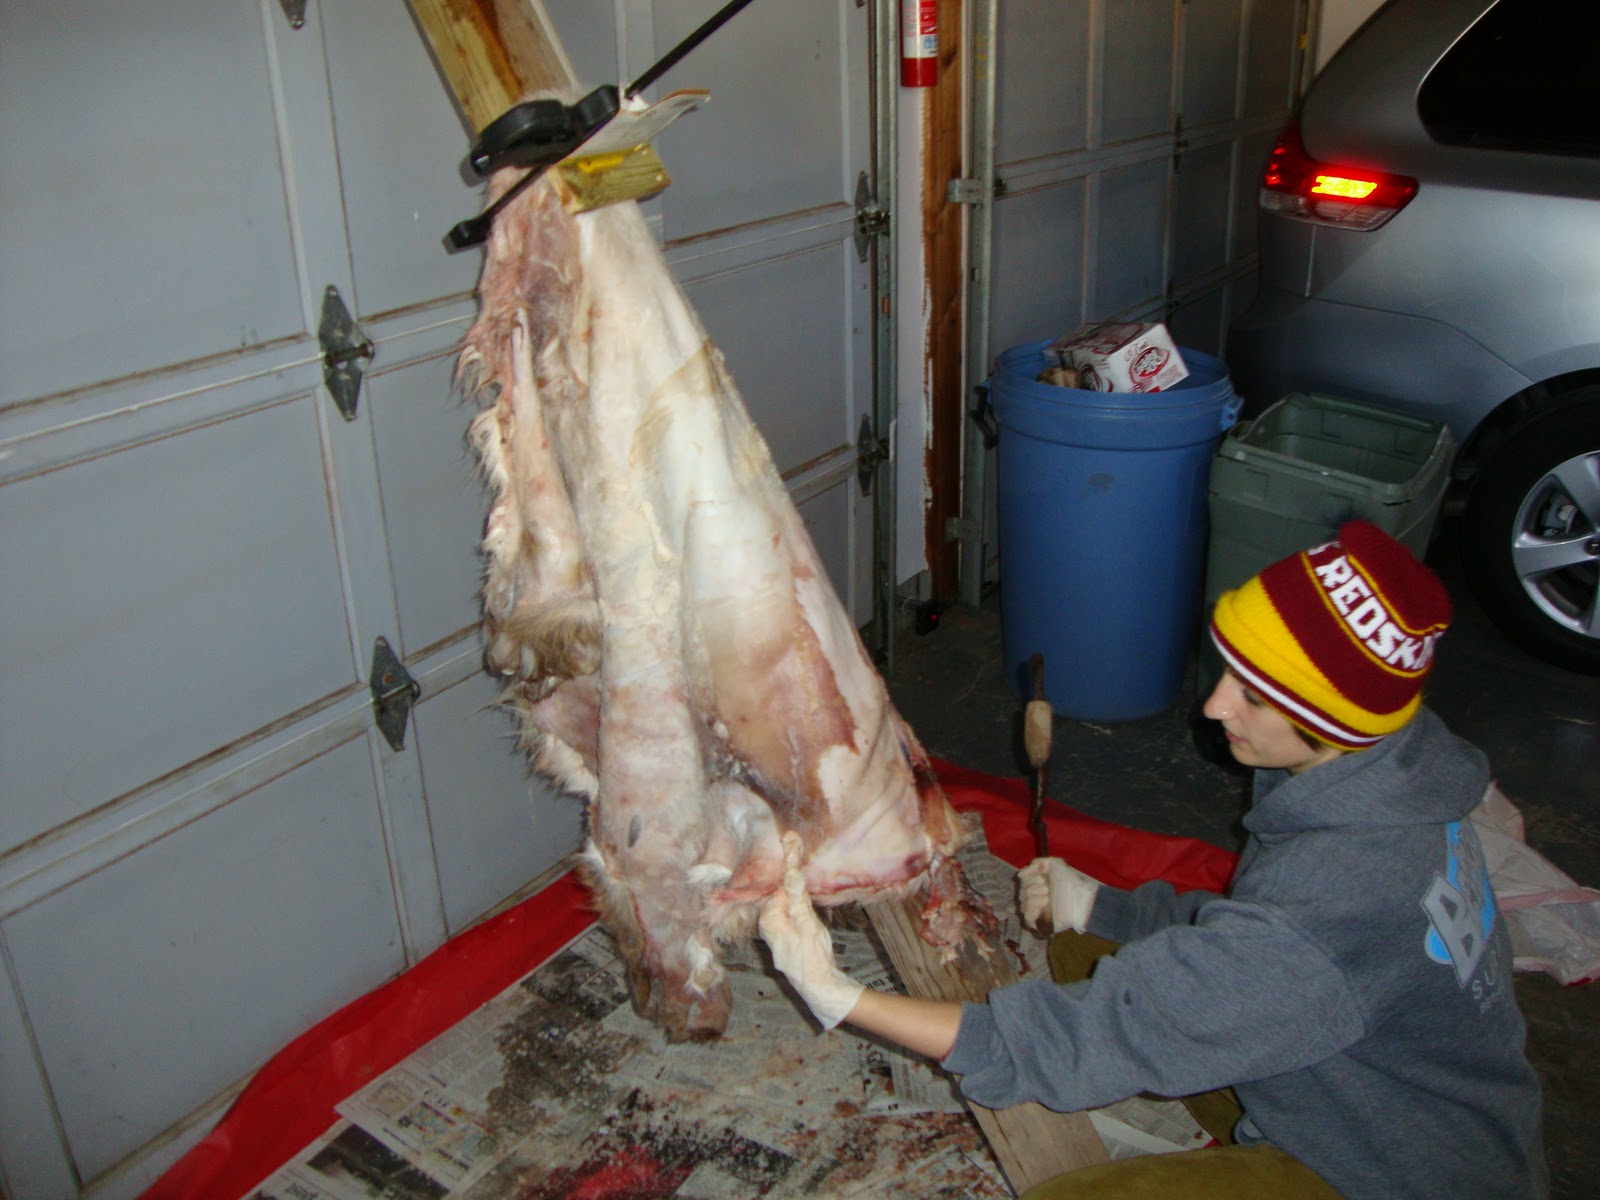
I finally wised up and -get this- I did what the book told me to do! Found a fleshing post to lean against the garage door and hung the hide using a C-clamp (thanks Dad!). Jonathan (objects professor) let me borrow a drawknife and skinning knife from his collection, and they worked perfectly. The drawknife has to be sharp, but not too sharp (“the book” says it should have a beveled edge but be dull), and the skinning knife was a bit sharper to cut down really thick areas. I only needed to remove flesh ½ in or thicker, but it took me hours to get the job done.
 |
| The drawknife I have has handles that are ideal for a pull down fleshing beam, but the beam was so tall that I had to use a clamp instead of wedging it between the beam and wall. This made moving and positioning the hide a little difficult. |
 |
| Removing a chunk of flesh (see it dangling? |
 |
| Relatively clean flesh side. |
The next step: Bucking solution.
There are a couple of different bucking solutions that you can use, but I chose the traditional wood ash.
My grandparents have an active fireplace (which makes visiting them very cozy) and they gave me a five gallon bucket full of ashes.
They burn hardwood, so I needed to make sure that the solution wasn’t too alkaline for the hide.
I did a 2:1 ratio of ash:water and let the bits settle to the bottom.
I then floated an egg in the top layer of water.
If the egg wasn’t floating above the water, I added more ash because the solution was too weak.
If the egg floated but rotated to its side, I added more water because it was too strong.
Once it floated with one end out of the water exposing a quarter-half dollar size area, then it was just right.
 |
| Stirring the ashes in water. Using gloves because the alkalinity can majorly dry out your hands. |
 |
| Three eggs were used for the testing. We make sacrifices for art and science, people. |
It took a few hours of testing to make sure that it was the correct strength and I didn’t get it bucking until 9:00 on Christmas Eve.
 |
| Dipping it in the solution that was finally considered the correct strength. |
 |
| Good sloshing action to make sure the whole hide was coated. |
I haven’t done research on modern/synthetic tanning, so I don’t know (yet) how it’s done, but I talked to a taxidermist recently who told me that bucking is definitely an old and time-consuming method (and has been replaced). In this process it’s important for the removal of the hair.
The alkalinity of the wood ash removes mucous from the inner layers of the hide that loosens up/swells the grain layer (layer of the skin that holds the hair follicles), as well as clearing room for the oils from the brains to penetrate the hide to make it soft.
The amount of time needed for bucking depends on thickness of the hide and surrounding temperature.
“The book” suggested at least 3 days, so I moved it inside to our hearth to stay warm and waited for the hide to swell (and I celebrated the holidays with the fam).
So now, we wait....


wow fran! i really need to step up my game with this basket weaving thing... but i'm so impressed - the blog is great!
ReplyDeletethe egg test sounds strange. In order to test an egg for freshness, you cover it in water......if it lays down, it's fresh; if it "leans", it's iffy; if it floats, throw it out. Seems like the freshness of your egg would throw off your PH test for the ash water??????
ReplyDeleteHi Sherrye! The book that I used recommended the egg test, but didn't get into the science behind how/why it worked. I had the same thoughts as you and used the freshest eggs we had on hand. You really could tell if the bucking solution was strong or weak, since the fresh egg sank more when the solution was weak (as expected since the ratio had more of the neutral pH water in which fresh eggs sink, and not enough of the alkalinity from the wood ash). Since I could see the egg moving around with the addition of more water and/or ash, it seemed like it was working. Ha, so basically I'm only answering your question by saying that I did what the book said and the egg seemed to be responding in the appropriate way. Sorry I can't get more into it!
ReplyDeleteNot a problem. Just curious if it would affect it.
ReplyDelete